Frequently Asked Questions
Air Display 3
General
What is Air Display?
Air Display allows an assortment of devices (iOS devices, Android tablets, Macs, and Windows PCs) to be used as additional displays for a Mac computer. In the past, we supported Windows PCs as hosts for Air Display, but now only Mac hosts are supported.
Air Display 3 allows you to use up to four client devices as interactive screens for your Mac.
Like a normal computer monitor, by default Air Display is set to function in Extended Desktop mode, which will have the device display behave just like an any other external screen once connected.
There is also the option to enable Mirror Mode, which will have the display device show the same content that is on the primary display.
How do I use Air Display?
Air Display works by using two different pieces of software, a Host and a Client, which allow your computer to communicate with your chosen display device.
The Host software runs in the background on your main computer, and the Client app runs on the device you wish to use as an extra screen.
The Host listens for Client connections over Wi-Fi or a wired connection, and when you launch the Client app and tell the Host to make a connection, your computer treats that new screen the same as if you’d plugged in an extra monitor.
With the iOS app Air Display 3, you run the Host on your Mac (the icon will launch into your menubar, near the clock in the top right of your screen) and the Client on the iDevice. Then plug the iDevice into the Mac to connect. It’s that simple. The iDevice will connect to your Mac automatically when both the Host and Client app are running and connected through the USB cable.
What’s new in Air Display 3?
USB Connections
Air Display 3 allows up to four client devices to connect to your Mac host simultaneously.
Air Stylus Features Included
Air Display 3 allows your iOS device to be transformed into a seamless, pressure-sensitive drawing surface for your favorite Mac graphics programs.
How is Air Display different from Apple’s Sidecar?
Sidecar is awesome. But it only works on a very limited range of compatible devices:
Air Display works in a lot of configurations that Sidecar doesn’t attempt to handle. Air Display supports:
- An older Mac as the host computer
- An older iPad as a Mac screen (with the iOS client app, from the iOS App Store)
- An iPhone as a Mac screen (also with the iOS client app, from the iOS App Store)
- Another Mac as a Mac screen (with the Mac client app, from the Mac App Store)
- A Windows PC as a Mac screen (with the Windows client app, available from our web site)
- An Android tablet as a Mac screen (with the Android client app, from Google Play)
Air Display also supports up to four simultaneously connected devices, rather than just one.
As an added bonus, you can use Air Display and Sidecar at the same time, connected to different client devices.
Compatibility
When will Air Display 3 be available for Windows?
In the past we supported Windows PCs as hosts for Air Display, but now, only Mac hosts are supported.
There is sometimes some confusion because we still offer a Windows client app (for turning your PC into a monitor for a Mac host).
We have begun the engineering work to revive Windows host support. If you’re interested in hearing when that goes into a beta test and final release, please sign up for our newsletter at the bottom of this page.
What are the system requirements for your main computer?
Operating system: The Air Display Host software is compatible with Mac OS X 10.8 or later (excluding 10.13.4–10.13.6).
CPU: The Air Display Host requires an Intel-based Mac. Apple’s new M1-based Macs do not support virtual video drivers.
Which devices can Air Display 3 use as an extra display?
Air Display 3 will run on any iPhone or iPad running iOS 11 or later.
Will Air Display work with an AppleTV?
Air Display does not natively support connections with Apple TV.
You can, however, use Apple’s AirPlay to transmit the screen of an iOS device that is connected with Air Display to an AppleTV.
For more information about using AppleTV and AirPlay click here.
Can Air Display show my device screen on my computer?
No. Air Display cannot broadcast an iOS or Android screen to a computer display. If you want to do that, please check out the products offered by our friends at Air Squirrels.
Can Air Display use a wired connection?
Yes. Air Display can connect wirelessly as long as your computer and the display device are on the same network. It does not matter if the computer is using a wired connection versus a wireless connection. So for example if your computer is wired via Ethernet to a network that has a Wi-Fi router, then your iPad can connect to your Mac via Wi-Fi-to-router-to-Ethernet.
On iOS, Air Display 3 can also communicate over your charging cable, if you connect your Mac to your iOS device with that.
For a Mac-to-Mac or Mac-to-PC connection, Air Display can use any wired data connection that is compatible with the devices. For Mac-to-Mac, that includes Ethernet, USB-C, Thunderbolt 2 or 3, Firewire 400 or 800, or any combination of those with the appropriate adapter. If you have an older Mac with a Mini DisplayPort video port, which happens to be physically identical to Thunderbolt 2, that won’t work because it doesn’t support a data connection. Likewise, you can’t connect via an HDMI cable.
Note: If a complex network topology causes the devices to be on different local IP subnets you will need to use the ‘Connect to Other’ option to connect using the IP address of the display device.
Will Air Display ever be available on Linux?
We have no plans at this time to develop a Linux version of the Air Display Host.
Features
How can I rearrange my displays?
When Air Display is connected, go to System Preferences > Displays > Arrangement on your host Mac.
Click on your Air Display screen and drag it to the position you would like it to be.
To choose which display is the main monitor, drag the little menu bar onto it.
In the Arrangement tab you can also configure advanced mirroring. Just option-drag one monitor onto another to mirror the two. So for example you could have five monitors with monitors 1, 2, and 4 mirrored, and the other two independent.
Can Air Display connect using Bluetooth?
Bluetooth does not provide the high-speed bandwidth needed to support Air Display.
Why isn’t touch input working on my device?
If touch input isn’t working, one of two things is going on.
- You may have Presentation Mode enabled. Click the Air Display icon on your computer and then click the gear icon to bring up Preferences. Make sure Presentation Mode is disabled. If it is already, try toggling it ON and back OFF.
- You may need to enable Accessibility. Just go to System Preferences > Security & Privacy, select the Privacy tab, and click Accessibility. You may need to unlock the little padlock icon with your Mac password. Then make sure AirDisplayHelper is enabled.
How do I use Air Display without a wireless network?
For iOS, your first option would be to use Air Display 3’s USB connection. Simply open the Client app on your iOS device while it’s tethered to the Mac through the USB cable. The connection is automatic.
Should you wish to have more freedom of movement and connect Air Display without the cable, Air Display can still be used in environments without a Wi-Fi network established as long as both devices are Wi-Fi capable.
To do this, you’ll need to set up an ad-hoc network connection. An ad-hoc network is a direct peer-to-peer connection between your computer and the display device. This can be set up without any existing network or when network settings prevent you from connecting normally.
How do I set up an ad hoc (computer-hosted) network?
- Click the WiFi icon in your menubar
- Choose Create Network…
- Name the network and click Create
- Now on your iOS device, go to the main settings, and connect to the network you just set up as your Wi-Fi connection.
If you can’t get connected to your iOS device, try disabling the Ethernet port on your computer, so only your Wi-Fi connection is active.
Can Air Display connect multiple displays?
Air Display supports connecting multiple devices.
To do this you’ll need to install the Client app on to each device you wish to use as a display.
To connect additional displays simply click on the Connect button to add up to four devices shown in the Host software’s device list. It’s that simple!
Air Display supports connecting up to four clients. One caveat: no more than one iOS client can be connected via USB. The others must be wireless.
Does Air Display broadcast sound to the display device?
No. You will need to rely on the primary computer for sound.
How do I mirror my displays so they show the same thing?
Quick Tip: command+F1 will toggle mirror mode
When Air Display is connected, go to System Preferences > Displays > Arrangement.
Check the Mirror Displays box.
PRO TIP: If you have three or more monitors, you can option-drag one monitor onto another in the Arrangement pane. That will mirror just a subset of your monitors.
Troubleshooting
The Air Display Host says my drivers are not Authorized.
As of High Sierra, Apple began requiring that all kernel extensions be explicitly user-authorized.
The UI for authorizing drivers is a little tweaky. You need to authorize within thirty minutes of installing new drivers, or Apple will hide the authorization UI. If this is hidden for you, you can bring it back by reinstalling the Air Display Host. Just be sure to go straight to System Preferences > Security & Privacy > General as soon as the system reboots. (Make sure you look at the General tab, not the Privacy tab.)
Air Display connects but by main display is not correct!
The OS X may trigger mirroring mode when first connecting, or when changes occur.
Command+F1 will toggle mirroring on a Mac.
The reason that the resolution changes is because the smallest resolution available in a set will be a limit for all displays when mirroring.
I do not see the menubar icon after installing the server software
If you do not see the new icon in the menubar, try opening up your Applications folder and running the Air Display Host app located there. To have Air Display Host start automatically when you restart your host Mac, enable it in System Preferences > Users & Groups > Startup Items. (This setting is enabled upon installation.)
How do I apply a license file to the Windows client?
Applying a license file is only needed when you are upgrading the Windows trial version from our website to a full version.
If you haven’t already, download the Windows client app here, under Installation.
Double-click the license file that was emailed to you after your purchase.
If you need a new copy of the license file emailed to you please contact us at support@avatron.com with your request.
How do I uninstall Air Display?
You can uninstall the Air Display Host software by launching the app Uninstall Air Display, in the Applications > Utilities folder.
If you don’t have the uninstaller app on your Mac due to a partial uninstall, you can download the installer.
And if for some reason the uninstaller is unsuccessful, you can uninstall manually with these steps:
Find and remove each of the following:
(NOTE: Some of these folders are normally hidden. The easiest way to access them is to use the Finder > Go > Go to Folder, and type or paste these paths.)
• Go to /Library/Extensions and remove AVVideoCard.kext and AVFrameBuffer.kext
• Go to /Applications and remove the Air Display Host app
• Go to /Applications/Utilities and remove the Uninstall Air Display app
• Go to ~/Library/Preferences and remove all of the preference files that start with com.avatron
I can’t move Mac windows onto the Air Display screen
If you are seeing a desktop image on your secondary device, you have successfully connected.
At this point you should be able to drag Mac windows onto the Air Display screen. If you can’t, you’re almost there but have just one more step.
To get the Air Display screen to update properly, you will just need to enable Screen Recording in the privacy settings. Apple has locked this down a bit recently. Here’s how to do it:
- Go to System Preferences > Security & Privacy > Privacy
- Scroll down and select Screen Recording. You should see Air Display Host listed in a box at the right.
- Enable its checkbox to allow it to “record the contents of your screen, even when using other apps.” (You may need to click the padlock and enter your password to allow the change.)
Note: Although the permission we need for streaming the contents of the virtual video display is labeled “Screen Recording” by Apple, Air Display does not actually record anything. It just gets the pixels from the virtual display and streams them. Your data is not stored to disk or sent anywhere. For security, the Air Display Host doesn’t even connect to the Internet except to check for software updates.
How do I make Air Display show exactly what is on the primary display?
You can do this by enabling display mirroring in System Preferences. Open up System Preferences > Displays > Arrangement and there will be a checkbox at the bottom that says Mirror Displays, which will enable you to activate macOS’s mirror mode.
Text is too small to read
This will happen if the Air Display settings has Retina turned ON but HiDPI turned OFF. Because that setting has a high resolution on a small screen, it will make your windows and text appear small.
You can fix this in one of two ways. First, click the Air Display menubar icon on your host Mac, click the little gear, and select Preferences. Then either:
- Turn Retina ON and HiDPI ON. This will make everything normal sized, with beautiful 2x resolution. It will be a little slower though, because HiDPI uses 4x as many pixels.
- Turn Retina OFF. This will make everything normal sized, with normal resolution. So not as crisp as HiDPI mode, but nice and fast.
Keynote does not run in presentation mode
Keynote uses hardware rendering when it is in presentation mode. Air Display is a completely virtualized display adapter so it cannot access any of the hardware features in the computer.
A program that tries to use the graphics card to render something this causes problems on the Air Display screen. Keynote does this and there isn’t any way to disable it and activate software rendering.
As an alternative solution, recent versions of PowerPoint do not have this problem.
My video player isn’t displaying properly
This is likely because the video is encoded with HDCP copy protection. macOS will not display copy-protected content on a virtual display.
The device I connected with Air Display is acting as the primary display
This can be fixed using the System Preferences > Displays > Arrangement menu. Open this menu and you’ll see the two blue screens representing the placement of your displays. In that diagram you can click on the white bar that represents the menubar and drag it to the desired desktop. To adjust the dock you can use the System Preferences > Dock menu.
Please Note: Due to the way that OS X handles positioning the dock with multiple displays, if you have the Dock positioned on the left side and Air Display arranged to the left of the primary screen, the Dock will automatically be positioned on the Air Display screen. This is a limitation of macOS and not something we can adjust with our software.
A Mac app does not look right on the iOS screen through Air Display; how do I fix that?
Air Display cannot use GPU/OpenGL hardware accelerated rendering. Air Display is a virtualized display adapter which prevents it from interacting with any hardware at all.
Many Mac apps have a preferences option for enabling GPU-accelerated rendering. Look for such an option in the app you are having the issue with, and try turning it off. All should be well.
I’m having trouble with Photoshop, what can I do?
There are a few tricks to getting Air Display 3 to work correctly with Photoshop CS 5.x, 6.x, and CC.
Thing 1 – Check your Preferences:
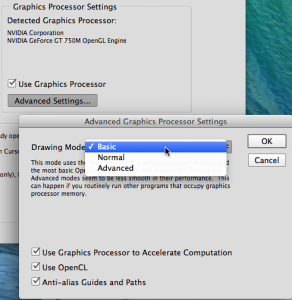
In the Photoshop “Performance” preferences, set the Advanced “Use Graphics Processor” settings to Basic.
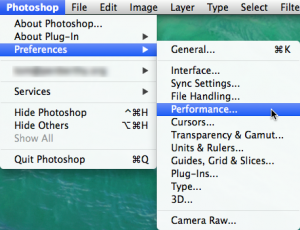
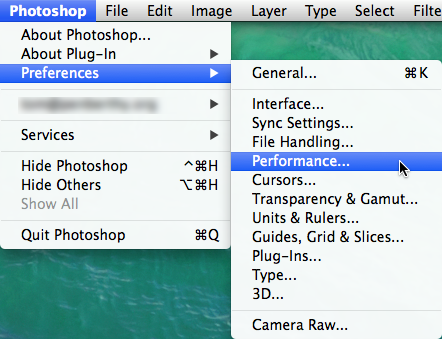
- First click to open the Photoshop menu, hover over Preferences and choose Performance
- Toward the bottom right, look for the “Use Graphics Processor” checkbox. If it isn’t checked, your computer might not have a dedicated graphics processor so you’re done. Air Stylus works fine in this scenario.
- Press the “Advanced Settings” button and choose either Basic or Normal (text descriptions of each setting pop up to offer the benefits and tradeoffs of each as you hover over them)

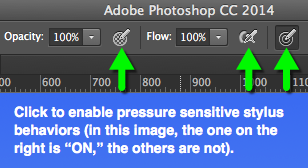
Thing 2 – Applying Pressure:
Photoshop has four brush options for how it handles pressure – opacity, flow, “airbrush style, and brush size. Brush size must be enabled to see effects of using a pressure sensitive stylus, but the other ones are worth experimenting with to find your ideal setting.
Thing 3 – Getting a “Preview” screen like in our Air Stylus video:
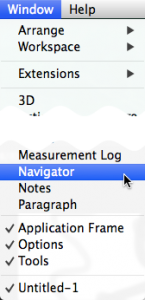
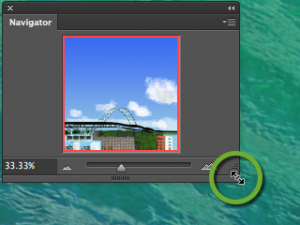
This is a somewhat hidden but very cool Photoshop feature called Navigator that’s somehow been in there since about 2001.
- In Photoshop, click on the “Window” menu and then select Navigator to open its thumbnail preview tab
- Drag the Navigator palette free of the main Photoshop window and resize it by clicking and dragging out the lower right corner of its window


Connection Troubleshooting
Connecting on Public Networks (Coffee Shops, Hotels, School Campuses, etc.)
Air Display requires certain ports open on the network in order to connect. Often times large public networks have these ports blocked for security reasons. Because these networks are usually not networks you can get settings changed on it is unlikely you’ll be able to connect in these spots.
In any situation where you are unable to connect, your first option is to connect with a cable rather than Wi-Fi.
However, you can use an ad-hoc network connection instead. Note, unless you have two Wi-Fi interfaces, or an Ethernet connection to the network you will not be able to access the Internet whilst using an ad-hoc network connection.
Instructions for creating an ad-hoc network can be found above, in the ‘Features’ section of the Air Display FAQ.
Connecting on Office/Corporate Networks
In order to connect wirelessly, Air Display requires certain ports open on the network in order to connect. Often times corporate or office networks have these ports blocked for security reasons. In these environments it is often possible to get the network settings adjusted so that you can connect. We suggest contacting the IT department and requesting their assistance to adjust the network accordingly:
Air Display requires multi-cast routing enabled. Air Display requires no restriction on UDP traffic over the network. Air Display requires ports 5353 UDP (for Apple’s Bonjour), 6000 UDP, 6001 TCP, 6002 UDP, 6003 UDP, and 6101 TCP.
Connecting on Home Networks
Connecting Air Display on your home network should be as easy as having both of the client and the server software running.
However, in the event that you are unable to connect on your home network we suggest temporarily disabling any firewalls that are running. This includes network security software and anti-virus software. These are the most likely culprits for preventing Air Display from connecting. Once you are able to find out which program is causing the problem you can edit that application’s settings to allow Air Display to connect.
If you have disabled all of your firewalls and are still unable to connect it could be a router settings issue. Consult your router’s manual for instruction on how to access the router’s web preferences page and verify the following settings:
Air Display requires multi-cast routing enabled. Air Display requires no restriction on UDP traffic over the network. Air Display requires ports 5353 UDP (for Apple’s Bonjour), 6000 UDP, 6001 TCP, 6002 UDP, 6003 UDP, and 6101 TCP.
My client device does not show up in the Air Display menu
If you are unable to see your client device in the list of devices to connect to, it most likely means that there is a firewall or network setting blocking UDP port 5353, which is the port Bonjour uses to advertise the Air Display device.
For the Windows client, this can also be indicative of Bonjour not being properly installed. We recommend trying to reinstall the newest version of Bonjour.
How can I tell if my network settings are preventing Air Display from connecting?
Your first option would be to use Air Display 3’s USB connection. Simply run the host on the Mac and the Client (app) on the iDevice. When the iDevice is plugged into the Mac’s USB port, Air Display will connect automatically.
Another option would be to set up awireless ad-hoc connection. This will create a peer to peer network between your devices so you can isolate if it’s the network causing the issue or something else.
My Firewall is disabled and Air Display still will not connect
If you have completely disabled any firewalls or software that may be preventing Air Display from connecting the next thing to check is the router. Consult your router’s manual for instruction on how to access the router’s web preferences page and verify the following settings:
Air Display requires multi-cast routing enabled. Air Display requires no restriction on UDP traffic over the network. Air Display uses ports 5353 UDP (for Apple’s Bonjour), 6000 UDP, 6001 TCP, 6002 UDP, 6003 UDP, and 6101 TCP.
The host thinks it is connected, but the client app is stuck on the ‘waiting for computer’ page
Please force quit the Air Display app on your client device and launch it again.
Another option is to power cycle the client device by powering it down and back up again.
Using Air Display as a Drawing Surface
What are the requirements to use pressure sensitive features of Air Display 3?
The iOS client app Air Display 3 supports pressure-sensitive pens, including Apple Pencil.
“Synthetic pressure,” in other words using your finger’s surface area to replicate pressure sensitivity, requires iOS 8 and up.
In order for pressure-sensitive pens to pair with your iOS device, the device must have Bluetooth 4 LE technology.
We recommend ensuring compatibility between your pen and iOS device with the pen manufacturer.
Which programs can I use with Air Display 3’s drawing features?
(if you see that we’re missing an app that should be here, please send us email and tell us!)
Compatible with Air Display 3 now:
- Acorn
- Aperture
- Art Rage
- Autodesk Sketchbook Pro, Express
- Flame Painter
- Intensify Pro
- Manga Studio 5
- Mischief
- Motion
- Pixelmator (there seems to be a rendering issue in 10.10 with Pixelmator at this time. We are investigating)
Adobe:
- Illustrator CC 2014
- Illustrator CC
- Illustrator CS 6
- Lightroom 5
- Photoshop CC 2014
- Photoshop CC
- Photoshop Elements 12
- Photoshop CS 6
- Photoshop CS 5.x (this is as far back as we will go with Photoshop)
We’re still working on these:
- Artboard
Autodesk:
- Maya
- Mudbox
- Sketchbook Express
- Corel Painter X3
- Studio Artist 4
Toon Boom:
- Animate
- Pencil Check
- Toon Boom Studio
- Harmony
Which pens does Air Display 3 support?
- Apple
- Apple Pencil (this is our favorite by far)
- Wacom
- Intuos Creative Stylus
- Intuos Creative Stylus 2
- Bamboo Stylus Fineline
- Adonit
- Jot 4
- Jot with Pixelpoint
- Adobe
- Ink
- Fifty-three
- Pencil (no palm rejection or eraser support yet)
Your finger and most ‘unsupported’ pens would have pressure sensitive events with Air Display 3 on iOS 8 or later, but with less pressure precision than a Bluetooth stylus. Please note that Fifty-three’s Pencil is not actually pressure-sensitive, but its shape allows you to simulate pressure by changing the angle.
One note: Most of the third-party Bluetooth styluses support palm rejection to some degree, but none of them comes close to the quality of Apple’s palm rejection. This feature is pretty essential to drawing fluently on an iOS screen.
Palm Rejection?
Once you have paired a third-party pen with Air Display 3, a fourth icon will appear on the iOS screen, resembling a hand extending a finger.
This will toggle touch interface on/off, allowing you to rest a wrist on the screen without that registering as a cursor event.
It’s worth noting that the quality or palm rejection by Apple Pencil is far better than that provided by the third-party styluses.
How do I pair a pen?
When Air Display 3 is not in presentation mode, three icons will appear on the iOS screen. The icon on the right, resembling a pen on a surface, is the pairing menu.
From the pairing menu, select the type of pen you have (Wacom, Adonit, or TenOne), activate the pen and then select that pen from the list of devices.
Note: Apple Pencil does not require pairing. It just works.